The PoleOS™ Company
IKE Office Tour – Intro and Navigation
In the time since IKE Office was first released, it has helped some of the biggest companies in telecom and utilities streamline the way they work with pole data for aerial infrastructure. And yet, we still get requests to see more about IKE Office all the time. So, to kick off 2022, we are launching our IKE Office Tour Series to show off how our software works and offer some tips and tricks to seasoned vets.
For our first tour, we will start with an introduction to IKE Office and take a look at the general user interface and navigation.
What is IKE Office?
IKE Office is designed to be the answer to a question people have been asking in utilities and telecom for years: How can I measure a pole without having to take each measurement manually?
IKE’s answer to that question comes through the combination of the IKE Field Collection Device and IKE Office. Fielders head out to the pole and take some images and collect data using custom forms (More on that later). Once the data for a pole is uploaded, it appears in IKE Office ready to be measured and annotated.
IKE Office is broken down into 3 key areas, the map, the photo measure screen, and the menu. By understanding each of these, you can easily navigate your way through IKE Office.
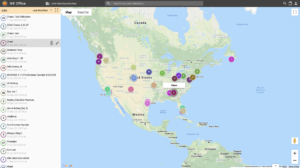
The Map
The first thing you will see when you log in is the map screen. Here, you will see all the jobs collected for your company or department in a map interface, as well as a list on the left-hand side of the screen. We will do a deep dive on the map coming up, so for now we will just look at navigation elements.
At the top of the screen from left to right will be:
- The IKE Logo – Access the menu,
- The department selector – Switch departments
- The search bar – Search for jobs or individual collections
- Organization-wide search – Search across all departments within an organization.
- Form List – A list of forms your company is using
- A link to your profile – Change settings, view your account, or log out.
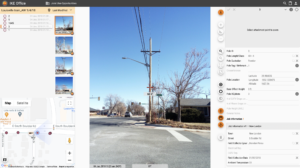
The Photo Measure Screen
Once a job or collection from the map or the list is selected, click the ruler icon to head over to the Photo measure screen. Here, poles can be measured, annotated, and exported.
The top navigation in the photo measure screen is the same minus the search bar. From there, there are 6 key elements to understand:
- The Big Photo
- This is the selected photo where users can annotate and measure specific points on the pole.
- The zoom window
- By clicking on the pole in the big photo, a zoomed-in image appears here. This image is used to pinpoint attachment points and verify information.
- The Data Panel
- All the collected pole data which can be edited or measured.
- The Collection List
- All the collected poles (collections) in this job.
- Photo List
- A list of all the photos in this collection. IKE Photos which can be measured are noted with an IKE Logo in the bottom right.
- The Little Map
- A small map to give you the relative position of the collection as well as the option to use street view to gather more information.
Explore more on the photo measure screen in the Measure and Annotate Tour.
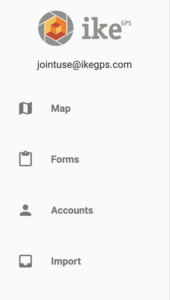
The Menu
From any screen, clicking the logo in the top right opens the menu. From there, navigate to:
- the map
- the form builder
- the accounts page
- the data import panel.
All of these will be explored fully in future tours. So, for the sake of navigation, the important part is that these options are always available by clicking the IKE Logo.
By understanding the map, photo measure screen, and menu, you can effectively navigate IKE Office. If you have any questions, please don’t hesitate to reach out.
Now that we have covered the basics, keep an eye out for upcoming tours featuring:
- Drag and drop form builder
- Interactive Maps
- Measurement and Annotation
- Exports
- Pre-populated fielding routes and work plans
- Pole Load Analysis Software Integration
The latest from the IKE Wire
Eight principles behind IKE Office Pro that deliver better total cost of ownership for utility field data collection
For engineering firms serving electric utilities and telecom providers, winning work ...
Read MoreWhat to consider when evaluating pole loading analysis software
Making the right decision affects everyone in your ecosystem When a utility selects a...
Read MoreIKE Q1 2026 product updates
2026 is off to a strong start. The first quarter’s updates focus on three thing...
Read MoreSubscribe to the IKE Wire
Get the latest insights on data acquisition and structural analysis from the ikeGPS experts.